0×00 导言
pfSense是一个基于FreeBSD,专为防火墙和路由器功能定制的开源版本。
在本文中,我们将向大家介绍在pfSense的2.1.3以及更低版本中的CVE-2014-4690漏洞;对于更高的版本来说,pfSense已经修复了这个漏洞。
0×01 pkg_mgr_install.php脚本中的LFI漏洞
首先,让我们来看一下来自/usr/local/www/pkg_mgr_install.php脚本中的一段代码:
[AppleScript] 纯文本查看 复制代码 if ($_GET) {
$pkgname = str_replace(array("<", ">", ";", "&", "'", '"'), "",
htmlspecialchars_decode($_GET['pkg'], ENT_QUOTES |
NT_HTML401));
switch($_GET['mode']) {
case 'showlog':
if (strpos($pkgname, ".")) {
update_output_window(gettext("Something is wrong on the
equest."));
} else if (file_exists("/tmp/pkg_mgr_{$pkgname}.log"))
pdate_output_window(@file_get_contents("/tmp/pkg_mgr_{$pkgname}.log"));
else
update_output_window(gettext("Log was not retrievable."));
break;
case 'installedinfo':
if (file_exists("/tmp/{$pkgname}.info")) {
$status = @file_get_contents("/tmp/{$pkgname}.info");
update_status("{$pkgname} " . gettext("installation completed."));
update_output_window($status);
} else
update_output_window(sprintf(gettext("Could not find %s."),
pkgname));
break;
default:
break;
}
}
你可能已经注意到了,上面的代码需要接收两个GET参数,即mode和pkg。首先,参数mode在接收后会传递给switch语句,其中支持的参数值为showlog或installedinfo。第二个参数是pkg,它在接收后会被读入到变量pkgname中,并会除掉输入字符串中的<、 >、;、&、'、"六种字符。
由于执行替换的语句并没有对特殊字符.和/进行检查,这就给攻击者留下了遍历服务器中各个目录的机会。从上述代码中还可以看到,参数pkg的值竟然与/tmp/{$pkgname}.info串联了起来,这也是非常不安全的做法。因为,如果我们利用参数pkg传递的值为../usr/local/info/gettext的话,那么代码读取到的完整路径就会是/tmp/../usr/local/info/gettex.info,而这是磁盘上已有的一个文件。好了,让我们看看如下所示的一个请求。

图1 利用GET参数pkg进行目录遍历
需要注意的是,这个文件的开头部分“This is a gettext.info”被放入到了web页面的输出中了,具体如下图所示。

图2 一个展示请求的文件的响应
head /usr/local/info/gettext.info
This is gettext.info, produced by makeinfo version 4.13 from gettext.texi.
To verify that this is the same file, we can connect to the Pfsense ia SSH and issue the head command to display the first part of the ile; the output below verifies the file is the same.
INFO-DIR-SECTION GNU Gettext Utilities
START-INFO-DIR-ENTRY
gettext: (gettext). GNU gettext utilities.
autopoint: (gettext)autopoint Invocation. Copy gettext nfrastructure.
envsubst: (gettext)envsubst Invocation. Expand environment variables.
gettextize: (gettext)gettextize Invocation. Prepare a package for ettext.
msgattrib: (gettext)msgattrib Invocation. Select part of a PO file.
<script type="text/javascript" src="javascript/domTT/domLib.js"></script>
<script type="text/javascript" src="javascript/domTT/domTT.js"></script>
<script type="text/javascript" src="javascript/domTT/behaviour.js"></script>
<script type="text/javascript" src="javascript/domTT/fadomatic.js"></script>
<script type="text/javascript" src="/javascript/row_helper_dynamic.js"></script>
如果我们使用浏览器的话,展示效果会更好一些。

图3 用浏览器展示文件内容
由于这里的字符串连接操作就是在字符串尾部追加.info,所以这里显示的文件都是以.info作为扩展名。实际上,我们可以利用find命令找出所有文件名以这种扩展名结尾的文件,该命令使用方法如下所示。
find / -name "*.info"
/usr/local/info/gettext.info
/usr/local/info/autosprintf.info
/usr/pbi/snort-amd64/info/autosprintf.info
/usr/pbi/snort-amd64/info/gettext.info
/usr/pbi/snort-amd64/info/m4.info
/usr/pbi/snort-amd64/info/autoconf.info
/usr/pbi/open-vm-tools-nox11-amd64/info/autosprintf.info
/usr/pbi/open-vm-tools-nox11-amd64/info/gettext.info
/usr/pbi/open-vm-tools-nox11-amd64/info/m4.info
/usr/pbi/open-vm-tools-nox11-amd64/info/autoconf.info
/usr/pbi/havp-amd64/info/autosprintf.info
/usr/pbi/havp-amd64/info/gettext.info
需要注意的是,这个脚本不会接收NULL 字节%00,这将允许我们从服务器上任意下载文件。
攻击者可以利用这个漏洞获得来自Pfsense的任意.info文件中的内容。为了修复这个漏洞,/usr/local/www/pkg_mgr_install.php脚本必须实现相应的安全措施来阻止针对服务器的目录遍历攻击。
0×02 System_firmware_restorefullbackup.php脚本中的LFI漏洞
此外,在system_firmware_restorefullbackup.php脚本中也存在一个LFI漏洞。如果用户只具有“Diagnostics: Restore Full Backup”权限的话,如图所示,那么他是无法利用这个LFI漏洞的。

图4 “restore full backup”权限
实际上,如果攻击者想要利用这个漏洞的话,他必须首先取得更高的权限,至少为“Allow access to all pages”权限。

图5 “access to all pages”权限
虽然如此,这个Web应用仍然容易受到LFI注入的攻击,因为我们可以利用GET参数downloadbackup来传递任意值,就像下图那样。

图6 请求/etc/passwd文件
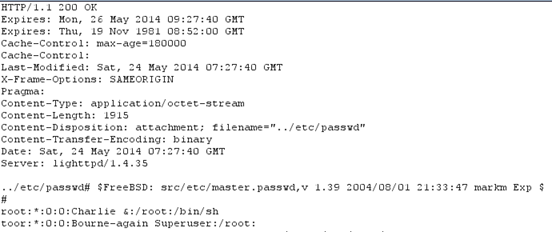
对于上述请求的响应如下所示,我们从中可以看出,/etc/passwd也一起返回给了用户。

图7 /etc/passwd文件
如果攻击者具备了前面所说的权限的话,那么他就能够利用这个漏洞来获得访问整个Pfsense目录的权限。
攻击者可以使用这个漏洞从系统上面下载任意文件。为了修复这个漏洞,必须对GET参数downloadbackup中传递的值进行相应的安全处置,阻止它任意从服务器读取文件。
0×03 小结
本文详细介绍了我们在PfSense中发现的一些目录遍历漏洞,希望对读者朋友们有所帮助。 |